STED HOLTON: Sted.H@RMP-RE.com


STED HOLTON: Sted.H@RMP-RE.com
Getting the word out about FTC imposter scams: The FTC will never demand money, make threats, tell you to transfer money, or promise you a prize. If you have been targeted by an illegal business practice or scam, report it.
While these developments are encouraging, too many people are still losing money to government imposters. There’s more work to be done and the FTC is on the case. But here’s how you can help, too. Talk about these scams. Help the people you care about know how to slow down, check it out, and stop before they pay a scammer. Read and share How To Avoid Imposter Scams. Help a friend sign up to get Consumer Alerts just like this one. And encourage people to report imposter scams at ReportFraud.ftc.gov.

From Xfinity: LINK Can you spot common tax scams?

From the Social Security Administration:
On National Slam the Scam Day – March 6 – and throughout the year, we give you the tools to recognize Social Security-related scams and stop scammers from stealing your money and personal information.
Help protect your loved ones and people in your community this Slam the Scam Day by:
Several weeks ago you were all notified that New Star and its web site service would be imposing a $2.49 cent fee for each Assessment Payment processed through the New Star web site.
As you know a great many unit owners were annoyed with this, not because of the amount of money involved, but because:
Whatever the arguments for or against this fee might be, there are a number of simple ways to avoid paying the fee.
First of all, stop paying Assessments through the New Star web site. And terminate any Autopay arrangements you set up on the site.
In the future:
1. You can simply write a check and mail it to New Star Properties.
2. You can also use your Bill Pay Service: Most banks and investment companies have a service which allows you to pay your bills from within their system. They will make out and mail a check for you to the location you note on the date of your choice. They will also make recurring payments if you so specify. (Set it up once and you are done.)
All payments should be made out to the Hickory Woods Home Owners Association with your unit address in the memo section.
They should be sent to:
New Star Properties
183A Mammoth Road
Londonderry, NH 03053
From Bob McGrath (contact Bob if you have questions):
Are you seeing an unusually high water bill?
How do I check to see if there is a leak in my irrigation system?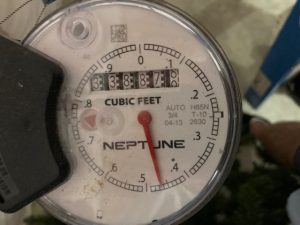
At the Clubhouse, there was a leak in the irrigation system; following the procedure (above) was helpful. The procedure was also used by a resident to diagnose a leak.
For additional information please visit the Town’s website or contact Kirby Brown at 603-432-1100 x 120.

8/22/2022 update: Sted Holton announced that Alliance will adjust your irrigation timer for $30. Contact Sted ASAP
Sted.Holton@
.
.
The Londonderry Town Council announced on
August 16th
that we will now follow
“Level Two”
Lawn Watering restrictions.
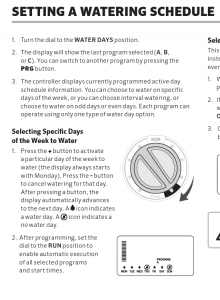
How to adjust your Hunter Pro-C control box:
Here is a video that explains how to change the day of watering.
Garage Door Opener Battery Replacement
Are you hearing a beeping in your garage? That usually means that either the power has gone off to your garage or house and the garage door opener is running on its battery only. That will be OK. The door will work slower than normal until the power is back on.
If the power is on and you still hear the beeping. It may mean that the rechargeable battery in the opener has failed and may need replacement. It recently happened to me after 4 years here. I did some research and was able to replace the battery with reasonable ease. While there is a chance that your opener may be a different model, it is probably a Lift Master brand. You will need to use a ladder and some tools to replace the battery.
If you are not comfortable with that you should seek assistance.
Better safe than sorry.
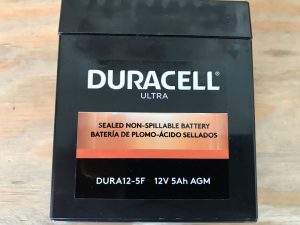
I bought a replacement rechargeable battery at Batteries Plus Bulbs and picked it up at one of their stores. A replacement battery can also be bought online from various sources.
My original battery looked like this.

My replacement battery looked like this.
Here is a link to a YouTube video that covers the replacement of the rechargeable battery.
https://www.youtube.com/watch?v=mLEQMejxZPc
If you would like some additional information, let me know and I can try to help you.
Bill Lannigan
973-568-7695
lannigan810@gmail.com
Important Information for You
There a section of the Hickory Woods website that contains useful information. From the Home Page, move cursor to Homeowner Info. From pull-down list, select Important Advisories.
This area contains a variety of articles written by members of Hickory Woods community which hopefully will provide you with some guidance in dealing with issues pertaining to your home and/or the home owner’s association. (Many of these articles will be a distillation of information gathered from discussions held in the “forum” section.) You may not have any of these issues, but if you do, these articles can be a starting point for understanding and next steps. An excerpt of several examples of site content are listed below with links to the full description.
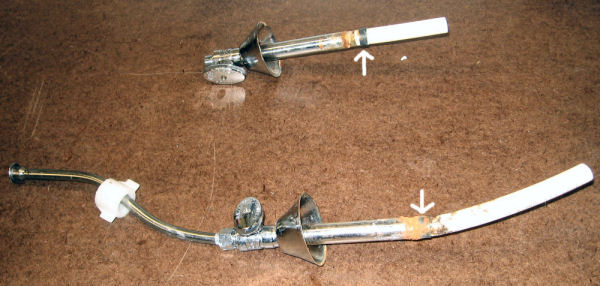
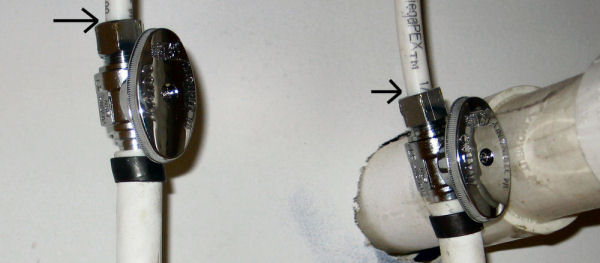
Home Owner Alert – Plumbing Leaks
A series of recent incidents of plumbing leaks in the community are the reason for this alert. It is possible that the plastic water supply lines sometimes fail at the connection to the shut off valves. (A plastic ferrule which holds the connection together slips off.) See the full article by following this link to site:
https://hwcommunity.info/2018/04/11/home-owner-alert-plumbing-leaks/
Safety Notice – Check Your Vents
Those little white PVC pipes we all have sticking out of the sides of the houses are for air intake and exhaust for each appliance. You should make sure they do not get blocked by snow. See the full article by following this link to site:
https://hwcommunity.info/2017/02/13/safety-notice-check-your-vents/
Rudd Water Heater
Wanted to share an experience I just had with my Ruud 40 Gallon Natural Gas Water Heater. We experienced no hot water and I checked out the water heater. See the full article by following this link to site:
https://hwcommunity.info/2016/09/19/rudd-water-heater/
Instructions for Irrigation Controller
If you do not have the instructions for programming your Irrigation Controller, a manual is available. See the full article by following this link to site:
https://hwcommunity.info/2016/07/09/instructions-for-irrigation-controller/
Battery in Your Irrigation Controller
Because of the recent power failure some of you may have noticed that your sprinklers are being activated at odd times of the day. I discovered that my Irrigation Controller had lost the correct time and date as a result of the power failure. See the full article by following this link to site:
https://hwcommunity.info/2016/05/26/battery-in-your-irrigation-controller/
Septic Systems and Septic Alarms
Hickory Woods homes have septic systems which consist of a large buried rectangular tank made of concrete and a leach field. Some of the residents also have a pump as part of their septic system. In addition to this article a package of information was given to each household in 2018. It contains lots of general information and also specific information for each household. See the full article by following this link to site:
https://hwcommunity.info/2016/06/03/septic-systems-and-septic-alarms/
Do I Need to Dehumidify?
It’s Damp and Musty in the Basement — Do I Need to Dehumidify? See the full article by following this link to site:
https://hwcommunity.info/2016/05/12/do-i-need-to-dehumidify/
Humidification
It’s Dry Outside—Do I Need to Humidify? See the full article by following this link to site:
https://hwcommunity.info/2016/02/11/humidification/
Radon and Hickory Woods
We moved to Hickory Woods in July 2014 and were advised to test for radon after a year. We tested for radon in August 2015, discovering that we had a level of 23.1 compared to the recommended level of 4 or less. After investigating and learning about radon and mitigation, we had a system installed in December 2015. Our radon level is now at 1. See the full article by following this link to site:
https://hwcommunity.info/2016/02/08/radon-and-hickory-woods/
A series of recent incidents of plumbing leaks in the community are the reason for this alert.
UPDATE
Based on the advice of the above homeowner, I had a plumber in to look at possible trouble areas in my own home.
The plumber advised that the plastic water supply lines pictured above sometimes fail at the connection to the shut off valves. (A plastic ferrule which holds the connection together slips off.) This is what happened to the above homeowner.
Accordingly, I had the plumber replace the following plastic water supply lines with braided stainless steel connections.
– 3 bathroom sinks
– dishwasher
(kitchen sink already had a braided stainless connection)
He also checked the toilet connections, but he saw no reason to replace them. Also, the toilets have metal supply tubes which leak slowly into your basement when a problem starts. They don’t destroy your house without warning.
Shut off the main water valve when leaving home for an extended period of time.
The photos below show the main shut off valve.
The first one shows the shut off lever vertical in line with the water pipe (this is the “ON” position).
The second picture shows the shut off lever horizontal to the right (this is the “OFF” position).

To turn “OFF” turn lever clockwise until it stops (only turns to the position shown in the picture).
To turn back “ON” turn lever counter clockwise to vertical position.
Drop Off Center – New Wednesday Hours
2018 Season
Saturdays Only
*April 7, thru November 17, 2018
8:00 AM — 4:00 PM
New Hours on Wednesdays from
May 2, thru September 19, 2018
3:00 PM -7:00 PM
Dear Hickory Woods Homeowners:
This message came in today from Glenn at Alliance Landscaping:
*********
We notice a lot of dry lawn areas at Hickory Woods.
We suggest that the home owners at Hickory Woods turn up their run times on their irrigation clocks.
This could be done by turning up the seasonal adjust on the clock, to 125-150%.
This will help in the month of August.
If a resident would like help doing this, they can call the office at 622-1111 and schedule an appointment. There would be a service charge for this.
Thanks, Glenn.
INSTRUCTIONS FOR ADJUSTING
RUN TIMES FOR IRRIGATION CLOCKS
Glenn from Alliance Landscaping called to offer these easy instructions to adjust your run times on your irrigation.
Increase irrigation for hot weather:
If you need to call Alliance to have them do this for you, there will be a $55 service charge.
There have been some instances that the thermostat programming have been shut off. Although not intentional this can affect the operation of the HVAC systems. There are multiple thermostats that link in to the HVAC systems and changes can affect the equipment’s operation with possible damage to the HVAC systems.
The Clubhouse committee will be responsible for all thermostat programming. The programming buttons are located at the bottom of the thermostat and are programmed for different scheduled times, heating and cooling. The committee will set the “heat and cool” cycles based on the weather conditions.
DO NOT PRESS THE HOLD BUTTON. It will freeze the programming.
A thermostat operation procedure has been placed at each thermostat in the clubhouse to adjust the temperature of the room(s) if individuals need to adjust the temperature based on personal preference .
Changing system configurations will affect HVAC operation. If there are programming questions please contact a committee member.
Clubhouse committee members are: Bob McGrath (chairperson), Jim Shearer (assistant chairperson), Ron Daigle, Bob Doyle, Marty Quinn, Doug Perrigo, Bob Stolarz, Carl Hohenstein, Rick Jenkins
This is a timely message from our neighbor, Dan Kilgore:
We were spoiled by last year’s low snowfall, but this year to date, it seems we’re going back to a good old fashioned NH winter!
If in your past lives, you lived like many of us in older homes, or heated by oil, there is a key safety difference with our modern natural gas systems:
By and large, they are all direct vent, including your furnace, water heater, and any other gas appliances you may have. Those little white PVC pipes we all have sticking out of the sides of the houses are for air intake and exhaust for each appliance. Although the height off the ground varies, it is critical that they NOT be covered over by snow, or it can damage the unit, or even allow exhaust gases to back into the house. With the winds we have here, and the blowing/drifting snow, they may need to be checked and cleared multiple times. And if you have an outside generator, remember that it too needs to be cleared. Better safe than sorry!
From Ken Julien:
Wanted to share an experience I just had with my Ruud 40 Gallon Natural Gas Water Heater. We experienced no hot water and I checked out the water heater. There is a Honeywell Control on the unit that had a blue light blinking 7 times followed by 3 second pause. After some investigation I determined that this was an indication of a Flammable Vapor Sensor (FVS) fault on the unit. After doing some research on line I determined that either the sensor went bad or had sensed some flammable vapor. I realized that Lisa had just done some spray painting in the basement and that that might be the cause of the issue. I contacted Ruud Technical Support (800-432-8373) to determine how to reset the sensor. Here are the steps that I followed that resolved the issue without calling a plumber. Technical support was very helpful and I also registered my heater at the same time.
This should restore the water heater to normal function unless the FVS is truly gone bad.
Effective August 26, 2016, Roberts Air – Mark Roberts – will no longer be servicing the Hickory Woods residents. The new HVAC sub for Hickory Woods residents is:
Jon Riley – Jon Riley Heating & Air Conditioning
Contact number: 603-244-9960
Email: jonrileyheating@gsinet.net
From Nancy Shearer:
“Why AED” from the American Heart Assn: https://www.heart.org/idc/groups/heart-public/@wcm/@adv/documents/downloadable/ucm_301646.pdf
Some of you do not have the instructions for programming your Irrigation Controller.
Follow this link to obtain a copy of the Owner’s Manual
Instructions for Pro-C Irrigation Controller
Pennichuck has just announced via US Mail that odd/even watering will begin immediately.
If you have your instruction book for your controller the directions are on page 23.
For those who do not, this is the procedure: Turn the dial to Water Days position.
With the cursor on the Sun position press the right arrow button once. ODD will flash on the screen. If EVEN is desired, press the right arrow again. Leave the cursor on the ODD or EVEN position as required by your house number.
Now you can move the dial to run times to readjust watering times per zone. When finished return the dial to RUN. You can still use the seasonal adjust setting.
If you have questions try me on 407-340-3928.
Good Luck Carl Hohenstein, 9 Tavern Hill Rd
Hickory Woods homes have septic systems which consist of a large buried rectangular tanks made of concrete and a leach field. Some of the residents also have a pump as part of their septic system.
Wastewater from all plumbing fixtures drains into the septic tank. Heavy solids settle to the bottom where bacterial action produces digested sludge and gases. Lighter solids that float such as grease, oils and fats, rise to the top and form a scum layer.
You as a home owner in Hickory Woods are responsible for maintaining your septic tank and for properly using and maintaining the system so that damage to the components will not occur.
The leach field (or drain field) is the second part of the septic system. The Hickory Woods Homeowner’s Association (HOA) is responsible for the leach field portion of the system provided that the unit owners have properly used and maintained their portion of the septic system, i.e. the tank.
Not properly using or maintaining your septic system may result in damage to the leach field. If the leach field is damaged as a result of improper maintenance of your septic tank, resulting repairs will be your responsibility.
Septic Tank System
Most residents have 1500 gallon tanks with two compartments.
21 residents have 2100 gallon tanks with pumps and three compartments.
(These are identified by a red alarm light outside the house and an alarm box located in the basement.)
Protecting Your System
Proper maintenance of the system will provide a lifetime of use with few or no problems. Improper use or lack of maintenance may lead to complete failure of the system, particularly the leach fields.
Septic Tank Maintenance
The unit owners are responsible for the pumping of the septic tanks. Based on normal usage the tank should be pumped out every 3-4 years. There are a number of service providers available and charges may vary which can include digging down to the tank cover.
Regular pumping of the system is necessary to avoid damage to the leach fields. The opening and pumping of the system is also a good time to have the pump checked if you have one.
Shared Leach Fields and Septic Tank Pumps
If you are one of the 21 unit owners with a pump system the following information is important to understand. If you do not have a pump, this information does not apply to your home.
Twenty-one homes here in Hickory Woods share leach fields with homes around them. These homes are equipped with a pump tank which pumps waste water from their septic tanks to the shared leach field.
This 2100 gallon pump tank contains a sewage effluent pump, control floats, and a high water alarm.
The control floats are set so that a specific volume of effluent is sent to the leach field. When the effluent in the pump tank rises to the “on” set level of the control float the pump is activated until the level reaches the pump “off” float setting.
Pump Alarms
Should the “on” float fail to activate the pump or should the pump itself fail the level of effluent in the pump tank will continue to rise in the pump chamber. When this level reaches the alarm float an audible and visual signal will be activated. (Here in Hickory Woods, homes that are serviced by pumps have a red light attached to the outside of the house and an audible alarm in the basement.)
Why septic tank alarms go off?
An alarm system gives you a warning when the water level in the pump tank is rising more than it should be. All septic systems with pumps should have some sort of timer installed. The timer controls when the pump is allowed to pump waste water into the drainfield. This prevents the leach field from being overdosed during periods of increased water usage.
What to do if your alarm goes off:
Push the silence button on the alarm box. The box may be located near the circuit breaker panel or on another wall.
This will turn off the audio alarm. There will be a red light and a green light located on the alarm box. The green light should always be on. The green light means the system has power. The red light means the alarm is getting a signal from the pump tank that the water level is getting higher than it should be.
Next, check the septic pump circuit breaker to make sure the pump has power. If the breaker is on, then check to see if there is any water puddling around the septic tanks. If you have been using large amounts of water, reduce your water usage and give the septic system a couple of pump cycles (12-16 hours) to see if the alarms red light goes out on its own. If the red light goes out, the system is working properly. It just needed to catch up with the additional water that was introduced into the system.
If the red light is still on after 12-16 hours, contact Harvard Management to set up a call for service. An alarm signal does not mean sewage is about to back up into the house. Alarms are installed to give you 24-48 hours of normal usage until sewage will start to back up. If the alarm is going off, reduce your water usage to a minimum. This will allow the pump to catch up quicker. If something is wrong, reduced water flow will ensure there is plenty of time before sewage backs up into the house.
Service Responsibility of pumps
Hickory Woods HOA is responsible for the maintenance and service of the pumps. In the event of an alarm, you must call Harvard Management Solutions (HMS) and request service. HMS will schedule when this will be done.
If service is due to resident misuse then they will be charged for the call and repair charges.
Routine maintenance of the pumps, if needed, will be provide by the HOA, through HMS.
If you have any questions about your septic systems please feel free to contact one of the Board of Directors and we will be happy to assist you.
Because of the recent power failure some of you may have noticed that your sprinklers are being activated at odd times of the day.
Thanks to my neighbor, Paul Fisher, I discovered that my Irrigation Controller had lost the correct time and date as a result of the power failure. Paul then showed me how to activate the 3V Lithium Battery that comes with the Irrigation Controller. It will now retain the correct time and date in the event of another power failure.
For those of you who do not have, or have not read, the manual that comes with the Irrigation Unit, I have reproduced the page dealing with activating the battery.
If your Irrigation Controller retained the correct time of day, that means either you or the installer activated the battery.
(Disclaimer: The following is based on the experiences of a fellow HW resident. I am not an engineer or professional tradesman. These are just my observations.)
Well, we’re all proud owners of brand new homes here in Hickory Woods. That’s the good news. However, we are still in New England, with all the crazy weather, and our new homes all have brand new concrete foundations and basement floors, and that concrete is still wet! I’ve been told it takes years to thoroughly dry out. And I do know that in my old house, which had a very dry basement, I had to run a dehumidifier from May until October — for the entire 30 years I lived there. But during the winter, I found it better to add humidity, at least in the upstairs living area. So back in Part 1 in February, we talked about Humidifying our homes as protection from the dry winter air.
Now that the warm weather is coming back, we’ll soon find out how our basements really haven’t yet fully dried. To check this, take that hygrometer, or Humidity Monitor you put upstairs last winter, and hang it in your basement. (And remember, if you didn’t get one then, they’re only about $20 at HD.)
DEHUMIDIFY – Dealing with too much humidity
Once spring comes around (and it will!), you’ll notice the humidity starting to rise – especially in your cellar. Those with fully underground cellars will feel it first, but even those with “open backs” will also get too humid. And opening them up for a day or two of airing out just won’t do it. Plus, you need to remember that there is a tremendous amount of moisture still in that concrete. That same black tar-like sealer that they put on the outside of the foundation to stop water from coming IN — also stops water from getting OUT. The only way the dampness can get out is through the air in your cellar! Some builders recommend dehumidifying full time for the first 1-2 years (just don’t try it in the winter, or when the cellar temp drops much below 55 degrees F — it won’t work).
Back to that personal discomfort scale:
High humidity:
And the house’s discomfort:
High humidity:
If you live somewhere with hot, humid summers, a central air-conditioning system, like we have, can help keep humidity under control – AC systems remove excess water as they cool air. In most cases, our present air conditioners seem to handle the living area quite well.
However, homes that have basements or below-grade living areas, may encounter high humidity problems year-round. And they don’t benefit from the central air. Here are options for reining in the damp:
High humidity in new construction
Newer homes in high-humidity areas are especially susceptible to excess interior moisture because they’re tightly built: air leaks are rare. And the concrete is new. However, that efficiency can cause humidity buildup. To counteract high humidity in a finished basement, you could add a heat recovery ventilator (HRV) to your HVAC system. It refreshes interior air and removes humidity without loss of heat. Cost: $3,500 on new construction, $4,500 for a retrofit. Might as well just air condition the entire cellar.
Before you consider that, you may want to consider other methods for at least a couple of years, to give the concrete more time to dry.
Stay warm — or cool— but stay hydrated!
That’s about all I can add. Maybe now I can get back to that relaxing retirement in our new
home (after I finish off the rest of the “Honey-Do” list!)
If you have any questions, shoot me an e-mail at dankilgore@comcast.net, or stop by for a chat.
It’s Dry Outside—Do I Need to Humidify?
It’s Confusing!
Part 1 of a Two Part Article
By Dan Kilgore
(Disclaimer: The following is based on the experiences of a fellow HW resident. I am not an engineer or professional tradesman. These are just my observations.)
Well, we’re all proud owners of brand new homes here in Hickory Woods. That’s the good news. However, we are still in New England, with all the crazy weather, and our new homes all have brand new concrete foundations and basement floors, and that concrete is still wet! I’ve been told it takes years to thoroughly dry out. And I do know that in my old house, which had a very dry basement, I had to run a dehumidifier from May until October — for the entire 30 years I lived there. But during the winter, I found it better to add humidity, at least in the upstairs living area. It’s best look at each issue separately. In this two part article, we will first address the need to eliminate the dryness; i.e.: to Humidify. (Come spring, watch for Part Two: How to Get Rid of the Dampness; i.e.: to Dehumidify.)
HUMIDIFY
Most experts agree that keeping your cold weather relative humidity in your home’s living area between 30% and 50% is good, with the ideal target of 40%-45%. The following is excerpted from Houselogic.com (http://www.houselogic.com/home-advice/air-quality/humidity-home-hygrometer/)
Household humidity: too little of it and you’ll zap your dog with an arcing blue spark when you touch his nose; too much and your carpet starts sprouting mushrooms. Equipped with a hygrometer to measure humidity, you can assess your needs and choose from a wide variety of tools for controlling household humidity.
How to check your household humidity
A simple instrument called a hygrometer, or a Humidity Monitor measures the amount of water in the air in terms of relative humidity (RH). Home Depot sells an electronic one, made by ACU-RITE for under $20. Locate your hygrometer in a living area away from the moisture produced by the kitchen or a bathroom. And then come summer, move it to the cellar for the season.
For maximum heating effectiveness and comfort, humidity levels should be between 30% and 50%. In the summer, a maximum of 55% is tolerable. Anything under 30% or over 60% will be uncomfortable and potentially damaging to your home.
Countering dry air
Overly dry air has a chilling effect because it boosts the cooling power of normal perspiration. Get your humidity level right and you can dial down the thermostat a few degrees and feel just as warm. You’ll boost your heating energy efficiency by 1% for every degree you dial down — a sizeable cost savings over the course of the winter.
Stay warm — or cool— but stay hydrated!
That’s about all I can add. Maybe now I can get back to that relaxing retirement in our new home (after I finish off the rest of the “Honey-Do” list!)
If you have any questions, shoot me an e-mail at dankilgore@comcast.net, or stop by for a chat.
And watch for Part 2 – Dehumidifying Your Home, coming in the spring!
This resource was created in February 2016 by Brad and Ann Perham, 11 Tavern Hill Road as a guide for our neighbors. We hope that by sharing our experience, we can assist others in navigating the radon question. We moved to Hickory Woods in July 2014 and were advised to test for radon after a year. We tested for radon in August 2015, discovering that we had a level of 23.1 compared to the recommended level of 4 or less. After investigating and learning about radon and mitigation, we had a system installed in December 2015. Our radon level is now at 1.
NOTE that your experience may be different. The resource links below are from reputable organizations and may assist you in learning more about radon.
What is radon?
“Radon is a colorless, odorless, radioactive gas. It forms naturally from the decay (breaking down) of radioactive elements, such as uranium, which are found in different amounts in soil and rock throughout the world. Radon gas in the soil and rock can move into the air….”
Read more from the American Cancer Society: http://www.cancer.org/cancer/cancercauses/othercarcinogens/pollution/radon
Radon also occurs in water. Because Hickory Woods does not have well water, we do not need to be concerned.
How are we exposed to radon?
“Radon can enter homes through cracks in floors, walls, or foundations, and collect indoors….Radon levels can be higher in homes that are well insulated, tightly sealed, and/or built on soil rich in the elements uranium, thorium, and radium. Basement and first floors typically have the highest radon levels because of their closeness to the ground.”
Read more from the American Cancer Institute:
http://www.cancer.gov/about-cancer/causes-prevention/risk/substances/radon/radon-fact-sheet
What are the health risks?
“The Surgeon General has warned that radon is the second leading cause of lung cancer in the United States. …Only smoking causes more cases of lung cancer. If you smoke and you are exposed to elevated radon levels, your risk of lung cancer is especially high. … Not everyone exposed to elevated levels of radon will develop lung cancer, and the amount of time between exposure and the onset of the disease may be many years….Breathing radon does not cause any short-term health effects such as shortness of breath, coughing, headaches, or fever….Though some people debate the number of deaths, it is widely agreed that radon exposure is the second leading cause of lung cancer.”
Read more from Kansas State University, Radon Program Services, funded by the EPA:
http://sosradon.org/health-basics
Here in New Hampshire, what are the radon risks?
The New Hampshire Department of Environmental Services has a map [1987-2008] of radon occurrence. Londonderry is in the 30% to 40%: http://des.nh.gov/organization/divisions/air/pehb/ehs/radon/documents/radon_by_town.pdf
“Although elevated radon levels may be found throughout NH, the north, east and southeastern portions of NH tend to have elevated levels more frequently.” http://des.nh.gov/organization/divisions/air/pehb/ehs/radon/categories/faq.htm#faq3
How do I test for radon?
“There are several techniques for measuring radon concentrations, some are for short term scenarios as brief as two days, others are designed to estimate radon concentrations over extended periods of time up to one year in duration. The most common technique is short term testing with passive test devices that collect radon with activated carbon. These devices may be obtained through a number of sources, including local building supply stores and the National Safety Council.”
Read more from the NH Department of Environmental Services: http://des.nh.gov/organization/divisions/air/pehb/ehs/radon/categories/faq.htm#faq3
We used a First Alert Radon Test Kit, available from many sources:
[February 2016]: Lowe’s for $12.97; Amazon for $10.49, Target online for $10.59, Walmart for $10.48. The cost of the test kit includes the analysis from a lab. You will need to pay around $5 for the postage to mail back the test kit. Results were available within a couple of weeks.
What are acceptable levels of radon?
“State and federal agencies recommend taking steps to lower radon concentrations when those concentrations equal or exceed 4.0 picocuries per liter in the lowest portion of a home.”
Read more from the NH Department of Environmental Services:
http://des.nh.gov/organization/divisions/air/pehb/ehs/radon/categories/faq.htm#faq3
How do I treat radon?
“All homes can be fixed… The techniques are straightforward and, for a typical single family residence, can be done in one day by a qualified contractor….Radon reduction requires more than just sealing cracks in the foundation. In many cases, simple systems using underground pipes and an exhaust fan may be used to reduce radon. Such systems are called sub-slab depressurization and do not require major changes to your home. These systems remove radon gas from below the concrete floor and the foundation before it can enter the home. …Sealing cracks and other openings in the floors and walls is a basic part of most approaches to radon reduction. Sealing does two things, it limits the flow of radon into your home and it reduces the loss of conditioned air, thereby making other radon reduction techniques more effective and cost-efficient. …Any information that you may have about the construction of your house could help your contractor choose the best system.”
Read more – from the National Program Radon Services at Kansas State University, funded by the EPA http://sosradon.org/Mitigation-basics :
How is my Hickory Woods home constructed concerning radon mitigation?
Preliminary radon mitigation piping is in your cellar. There is a piping system underneath the basement slab. One perforated piping system (holes on one side of the pipe) extends the width/depth of your house and connects to a pipe that emerges through the cellar floor at one corner. This pipe goes up through the interior walls of your living space/first floor, into the attic and out through the roof.
The radon mitigation system indicated for your home will probably be a fan installed in the attic that connects to this sub-basement piping system. The contractor will hardwire the fan in your attic. Codes for certified contractors do not allow the fan to be installed in the basement.
Check to see where the basement pipe is in your cellar. If you have a sunroom, the pipe may be directly under that room. Mitigation for this setup will need to be different because there is no attic above the sunroom. The alternative involves venting the basement pipe directly to the outside of your sunroom. The pipe extends up past the roofline and the fan is installed within the pipe. The original pipe that goes through the roof from the attic is capped off.
Who to call?
Ask for a Certified Radon Contractor. Brad called several contractors and narrowed it down to two companies:
Advanced Radon Mitigation & Water Treatment http://www.radonh2o.com/ 603-644-1207
Coletta Environmental Technologies http://colettaenvirotech.com 603-401-3563
What does the radon mitigation cost?
Quotes given, Fall 2015 (including electrical and sealing cracks in the floor):
Advanced Radon Mitigation & Water: Attic installation: $895 Exterior installation: $1195
Colletta: Attic installation: $695 Exterior installation: $995
Because we have a sunroom and needed to have the exterior vent and fan option, Hickory Woods reimbursed us the difference of $300.
We were very happy with Colletta and recommended them to Mike and Pat Bradley who had the attic installation. We are both quite satisfied. Installation of the system for our home was one person, 3 hours.
What are the radon levels after mitigation?
In August of 2015, our radon levels tested at 23.1. After mitigation in early December, the test result was a level of 1.
Questions?
We are happy to help: 603-402-9655 or annbperham@gmail.com
For a pdf copy of this: radon
The standard warranty on your Goodman furnace and A/C equipment is for five years, however, if you register the equipment within 60 days of installation, Goodman will extend the warranty to ten years. Since the equipment was installed in new construction and not as a repair, it may be acceptable to use your closing date as the installation date.
Please note before registering that there are three distinct equipment components to the furnace and A/C and each of them has its own serial number and each has to be registered. Those components are:
You will need to gather the serial numbers for each of the three components. The serial number for the furnace itself is found in the documentation packet for the furnace. The coil sits on top of the furnace and its serial number should be on a sticker. Do not confuse it as the furnace serial number which is found in the paperwork. Finally, the air conditioner serial number is found on a sticker on the outside unit.
Once you’ve gathered the three serial numbers, register your equipment on Goodman’s web site, http://www.goodmanmfg.com/. There you will find a menu item for “Product Registration”.
This information comes of your neighbor,
Pat Pann
The section will contain a variety of articles written by members of this community which hopefully will provide you with some guidance in dealing with issues pertaining to your home and/or the home owner’s association. (Many of these articles will be a distillation of information gathered from discussions held in the “forum” section.)
 Click to enlarge.